
The finished model. For this guide I chose the
GHQ 1/2400 GWG8 "Moltke Class" model.
STEP 1: OVERVIEW

The excitement of opening a new package.

Indexing the content and cleaning up any flash.
STEP 2: GLUING & PRIMING

The cleaned model is glued together (no turrets yet),
and glued to the base.

A base coat of matte black is applied.
STEP 3: PAINTING THE HULL

I always try to find some color pictures on google of
the ship I¨m about to do, just to get the nuances right. I've found a certain
scale of gray, that seems to fit very well with the German WW1 naval gray.

STEP 4: PAINTING WOOD & RUSTY METAL

Working my way around the model on any wood bits,
like life boats and rusty metal like anchor chains.

The model after steps 1-4
STEP 5: PAINTING THE DECK

The deck is extremely important. Its what gamers will mostly see,
and the first thing you'll notice when looking at the model.
So I want to get details crisp and work with a very light beige nuance,
that goes well with the darker wooden color and the grey.

When painting the deck, I leave a little black around all the details.
This will help enhance the effect of the wash applied later.

Results so far, and the deck is now ready for a wash.

I'm using a light brown wash working my way around
all the little details, and turret bases as well as the anchor chains.

I've favored GW's "Gryphonne Sepia" wash for the job.

The model after step 5.
STEP 6: HIGHLIGHTING THE HULL

Using a lighter nuance of grey, I trace all the edges
and sharp lines on the hull.

A little extra focus has been laid on tracing the hull edge
next to the light beige color of the deck. Again I try
to keep a little black between the two.
STEP 7: HIGHLIGHTING WOODEN & RUST DETAILS

Using a fine brush and lighter brown nuance, I carefully
dot on the paint to give the desired depth.

The model after highlighting.
STEP 8: HIGHLIGHTING THE DECK

Using a creamy beige, I trace the deck's edge towards the
hulls' edge - if I slip onto the little black line between, I repair afterwards.


The model after steps 6-7.
STEP 8: LIFE BOATS

I've seen some old colored post cards where the German
navy uses white life boats, so that's the color I'll stick with here.

OK, life boats done.
STEP 9: FURTHER RUST EFFECTS

Ships on the salty high seas did get rusty, and to simulate this I apply a
light coat of the brown wash around the anchors and also
on some of the porthole windows.
STEP 10: COMMAND BRIDGE AND SIGNALS

I'm assuming that the command bridge would have some fancy shiny wooden floor.
It might not be entirely historical, but looks great next to the gray and beige, so...

Ships used light signals and signal flags to communicate.
I'm applying a light blue to help the signal lamps stand out.
(If you like these kind of details, GHQ have it all included on the model, impressive)

The model after steps 8-10.
In the back the colors used for the command bridge
and signal lights.
STEP 11: ADDING THE KRUPP GUNS

What is a German warship without it's Krupp jewels?
Base coat of black is added after gluing them on.
Notice that when one turret will overlap another, I apply
them step by step.

The turrets get a base coat of gray and highlighting.
I'm using the same colors as for the hull.
STEP 12: AREAL IDENTIFICATION MARKINGS

I've seen a lot of BW areal photos of the Hochseeflotte,
and they all suggest that the German turrets were painted black
on the roof, while the forward and aft turret had a white circle painted.
This was for easy areal identification by compatriots.

The last gun is applied and highlighting is done.
STEP 13: THE FUNNELS

These were coal driven steam ships, and coal is black and dirty.
So, I use a little extra time adding details like a light drybrushing of black
to simulate some wear and tear.

The model after step 11-13.
STEP 14: PAINTING WATER

I'm using the Vallejo 898 Dark Sea Blue.
Not thinning the paint, I apply it in thick
lines at an angle to the boat. Building carefully
down the side of the hull, to give the effect of the water
pushed aside as the ship steams through it.

Another view at how the water is build
with waves using at thick paint.

The stern's push through the water creates a big front wave.
I'm creating this by applying an extra thick layer
of paint right at the front extending out to each side.

The finished effect.
STEP 15: HIGHLIGHTING WATER

I'm tracing up the now dried waves created
by the thick initial layer of VMC 898 paint.
For this I'm using a mix of VMC 898 and light grey.

Twirling and dotting out the paint on the wave tops,
and this is the end result.
STEP 16: WAVE TOPS & FOAM

A thick white paint is used, and dotted on with a 0/5 brush.
At the stern I'm dotting some white up the Hull, to create
that wave breaking splash effect of sea foam.

I trace out the former highlighted areas, dotting in some white.

The propeller splash is also added.

The result after steps 14-16.
STEP 17: RIGGING

Using a piece of black sewing thread,
I carefully tie a knot around the rear mast.
This will allow me to fasten an Imperial German flag later.

I do a second knot, and tighten it to make sure she stays put.

Using a small pair of scissors, I cut away any
surplus thread.

Using a sewing needle I dot some super glue
onto the back of the turret.

Using the back of my scalpel, I gentle press the
thread down on the glue dot.

Same procedure for the forward mast.
This rigging will be for signal flags.

Glue is dotted on, again using the tip of a sewing needle.

The scalpel is used to press down the thread on the glue.

Excess thread is cut away using the scissors.

The result after step 17.

Another view at the rigging.
STEP 18: FLAGS

This is actually an idea I got from my friend Jesper.
Using a simple marker tape to make flags.

Cutting out a little piece using the scalpel
and my daughters fancy ruler :0)

I carefully form the tape bit as a "V".

I hang the "V" upside down on the rigging.

I pinch the two sides of the "V" together to
form a small flag.

Using the scissors I cut the flag to the desired size.
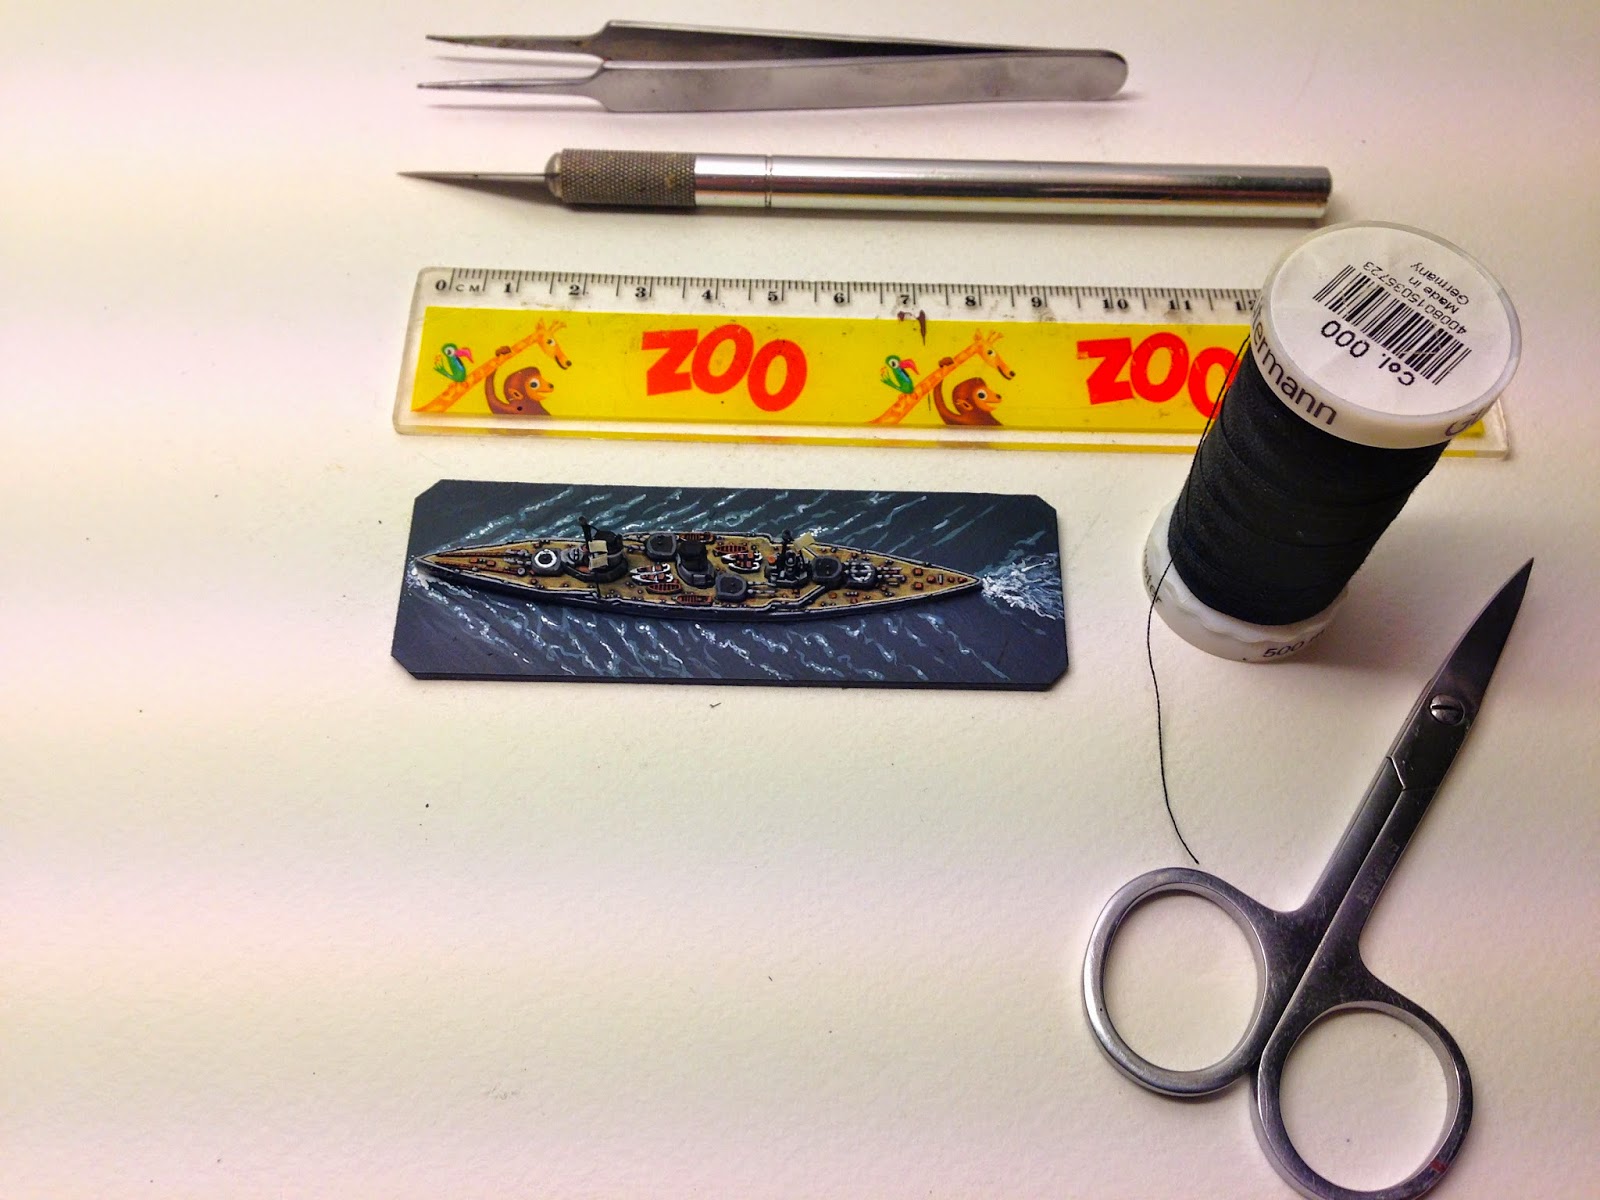
My "Rigging Kit".

Two signal flags are added to the forward rigging.

The tape flags are painted in desired colors.

The finished result after step 18.
I have no idea what the signal flags mean, but they look the part.
Imperial German flag is painted up in the rear mast.
STEP 19: A GLOSSY COATING FOR THE WATER

I'm using a basic acrylic glossy coat to get the water
shiny and clear. I apply a thick initial coating, again moving the
brush away from the ship at an angle, to simulate the shape of waves.
After the initial coating has dried up, I apply a second coating.

The result after step 19.
The green blue sea color gets really deep and realistic
when the glossy coating is applied.
STEP 20: NAMING YOUR BABY

The old girl needs a name, right?
So - I created some name tags in InDesign
using Imperial German/Royal Navy flags.
Also, I couldn't resist using a gothic letter font
for the German names. Its all about adding that period spice.
STEP 21: STEAMING OUT OF WILHEMSHAVEN

The finished result.
On her maiden voyage to my gaming table!

Rear shot.

Front shot.

On the prowl for something to aim her guns at!
THANK YOU ALL FOR YOUR SUPPORT AND INTEREST IN MY WW1 NAVAL PROJECT.
HOPE THIS GUIDE WAS USEFUL.
CHEERS,
SÖREN
Wonderful tutorial. You have me wanting to paint ships and I don't have any interest in naval gaming!
ReplyDeleteThanks Thomas, well I hope you do, I found it a very rewarding change from painting 28's
DeleteWhat Thomas said! Great tutorial.
ReplyDeleteThanks, I hope it'll inspire you to join in for a game, we've had a real laugh the last few games!
DeleteRegards
Sören
I can imagine! Your great posts on the subject really creates gaming interest and at the same time gives great insights on skilled painting.
DeleteReally good tutorial, Soren. The photos and instructions are of the highest quality. At first you blew me away when you added rust to tiny ares, then when you started on the rigging and flags - I just realized there's no way I could do those! :)! Amazing! Regards, Dean
ReplyDeleteThanks a lot Dean! I still think you should give it a shot though if you've got a 1/2400 or 1/1200 on the painting table. If all fails, put the blame on me for being a crappy tutor:0)
DeleteGorgeous job on this so little ship...great tuto!
ReplyDeleteCheers Phil! It was fun doing a completely different style of blog post!
DeleteFantastic tutorial and fitting for a print wargames magazine article! Your finished product is outstanding.
ReplyDeleteYou almost lost me at the very beginning with, "The excitement of opening a new package."
Great work!!!
Well Jonathan - I've never done tutorials before, so to be nominated for a wargames magazine article is about the best confirmation of a job well done one could dream about. Thanks buddy!
DeleteOutstanding tutorial, thanks for sharing!!!
ReplyDeleteYou're welcome - thanks for your kind comment!
DeleteGreat post, very informative and wonderful looking results.
ReplyDeleteGlad you liked it Matt, thanks for dropping by for a read and a comment!
DeleteMy word, that is superb. I have never painted anything at that scale and I am amazed at the attention to detail that you have put in, all the effort really shows and is definitely worth it.
ReplyDeleteBeing a regular follower of your excellent blog, I really appreciate your kind words. I had a few readers on TMP and here on the blog asking for a tutorial, and it was great fun to actually do something so different in terms of blogging style. I'm very glad you liked the result!
DeleteYour attention to detail is simply mind blowing Søren! Thank you for this outstanding Tutorial. Having seen your amazing work on those tiny ships I had to order some myself so your Tutorial will come in very handy. First I thought the biggest task ahead would be doing the water but you made it look dead easy. Now I think the rigging will prove extremely difficult for me as I normally don't have the patience for such things. But first of all it seems like I have to get me some smaller brushes... the smallest I'm using to date is a 2/0.
ReplyDeleteWow M, great news that you've joined the WW1 dreadnought frenzy, that is a true measure of success. I'm really looking forward to seeing what you, with your clean and crisp painting style, can do with these models, They have loads of detail, so coming from 28's they were a treat to paint. Will you guys be at Tacticon in Hamburg or at Salute in London 2015 by any chance?
DeleteRegards
Sören
Great work Soren!!!
ReplyDeleteexcellent tutorial, this is why you are a master painter! The ship is looks amazing and I hope to see it on the game board soon. Hopefully I will get my Merican Battle-wagons soon and we can have some what if games.
Thanks Mark, she's already at the club and HMS Warspite will join her soon. Looking forward to that US support for the Royal Navy, with ships like the Nevada it'll give the word firepower a completely new definition.
DeleteA truly magnificent tutorial Soren, I would not have known where to start with one of these little model warships, everytime I thought your tutorial was nearing the end you kept enlightened us all with a new additional piece of detailing, with great pictures of the progress.
ReplyDeleteThanks for sharing !
You're very welcome Chris, and thanks for the encouraging words. It was a first off, inspired by a few requests, but great fun to do, and I'm thinking about doing something similar for 28's at some point in the future.
DeleteGreat turtorial! Thanks for taking the time to explain how you paint those beautiful ships.
ReplyDeleteMy pleasure, thanks for dropping by for a read and leaving such a nice comment.
DeleteCheers,
sören
Brilliant! the best step by step tutorial I ever come across in terms of working on a project like this one you have here Soren! Great photos and script writing....awesome!
ReplyDeleteThank you so much for putting this article together for us wargamer/collectors bloggers to enjoy!
Salute!
Wow, Phil you made my day. Thanks man! I'll probably try out something similar for typical 28's like Napoleonic French Infantry or my personal favorite, Franco-Prussian stuff. Your words are very encouraging to this effect. Thanks again for the support!
DeleteAs the others have said – excellent tutorial! Very in-depth with clear instructions and pictures, and some great tips as well.
ReplyDeleteSeeing all the steps involved, and the attention to details, just makes your work all the more impressive!
Cheers Jonas, the flag thing was actually Jesper's idea, so I'll pass the credit for that one on to him. Hope to see you at a gaming table sometime soon, and that all is well at the residence with the little guy!
DeleteWonderful, clear, and inspiring tutorial! Fantastic work. A blueprint for a great blog post!
ReplyDeleteThanks for the kind words Sidney, I'll stick with this format then when I venture into a 28's tutorial at some point. Thanks for dropping by for a read!
DeleteBravo! That was an incredibly detailed and well put together how-to post. That your modelling skills are equally impressive just added further to what was already a wonderful tutorial. Thanks for sharing.
ReplyDeleteReally great article. I have given you full credit for inspiring my own humble efforts on my Blog. I am most grateful to you.
ReplyDeletehttp://horseandmusket2.blogspot.com/2016/08/jutland-1916-ghq-12400.html